
Guide: How To Turn Off Auto Enhance on Instagram

You take a photo you love, upload it to Instagram, and the second it posts, something looks off. It’s brighter than you remember, more saturated, more contrasty — like a filter got applied without your permission. By the time you notice, it’s already live, and Instagram gives you no way to dial it back.
Most people call this “Instagram’s auto-enhance feature.” Here’s the more accurate story, plus the fixes that actually work.
Does Instagram Really Have an Auto-Enhance Feature?
Not exactly. Instagram’s settings menu has no toggle called “Auto Enhance,” and Instagram doesn’t run its own enhancement filter over every photo you upload. In almost every reported case, the extra brightness, contrast, and saturation are baked into the photo before Instagram ever sees it — by your iPhone’s own camera processing, primarily Apple’s Deep Fusion and Photonic Engine systems, which merge multiple exposures into one “optimized” shot the moment you take it.
That’s also why the issue is reported almost exclusively by iPhone users — Android’s computational photography pipelines process images differently, so photos are less likely to come out looking over-processed after upload. It’s not that Instagram treats Android and iPhone photos differently; it’s that the phones themselves already look different before either one reaches Instagram.
It’s not surprising this gets misattributed to Instagram. People care a lot about how their photos look before posting — a 2021 study from City, University of London’s Gender and Sexualities Research Centre found that 90% of the young women surveyed edited or filtered their photos before posting online. When a photo suddenly looks different than expected right after hitting “Share,” Instagram is the obvious thing to blame, even when the real cause is upstream.
The good news: since the processing happens before upload, you can head it off by changing how you capture or prepare the photo — not by hunting for a setting inside Instagram that doesn’t exist.
How To Turn Off Auto Enhance on Instagram on iPhone: 3 Tips That Work
Once a photo has already been processed and posted, there’s no undo — Instagram doesn’t let you strip the effect or adjust brightness/filters after the fact on an existing post. So the fix has to happen before you upload. Here are three ways to get a more natural-looking result.
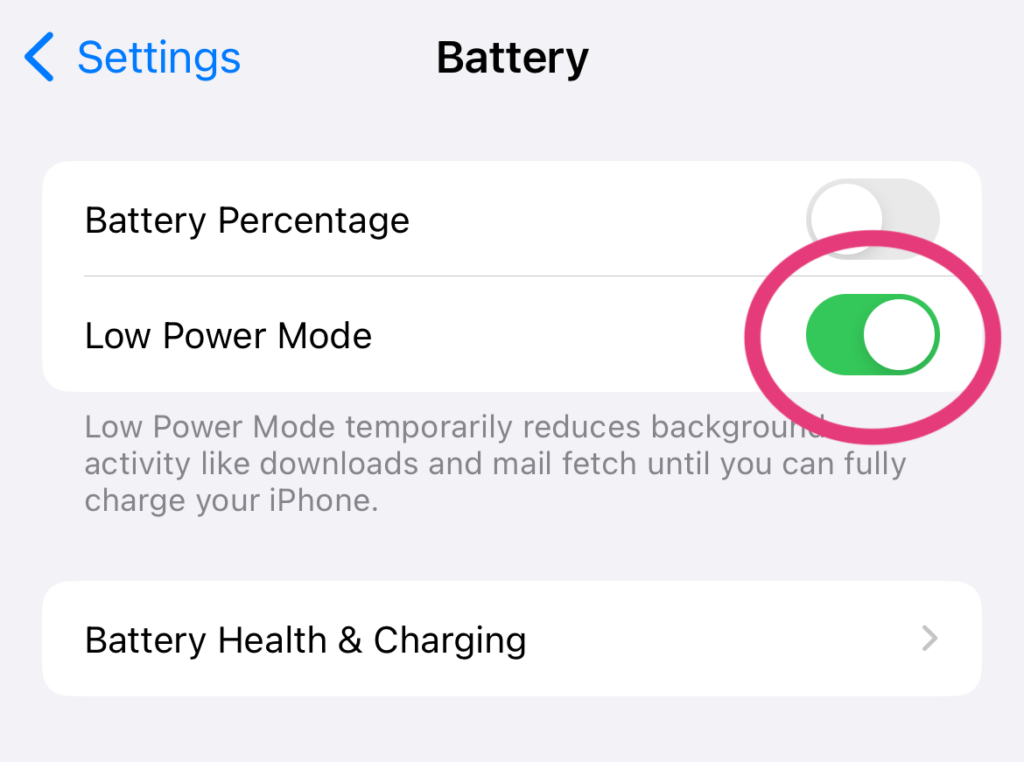
1. Turn On Low Power Mode Before You Shoot
Deep Fusion and similar computational processing are background tasks, and iOS scales back background processing when your phone is in Low Power Mode. Shoot with Low Power Mode on, and your photo is far more likely to come out of the camera looking like what you actually saw — no extra contrast or saturation baked in.
- Open the Settings app on your iPhone.
- Tap Battery.
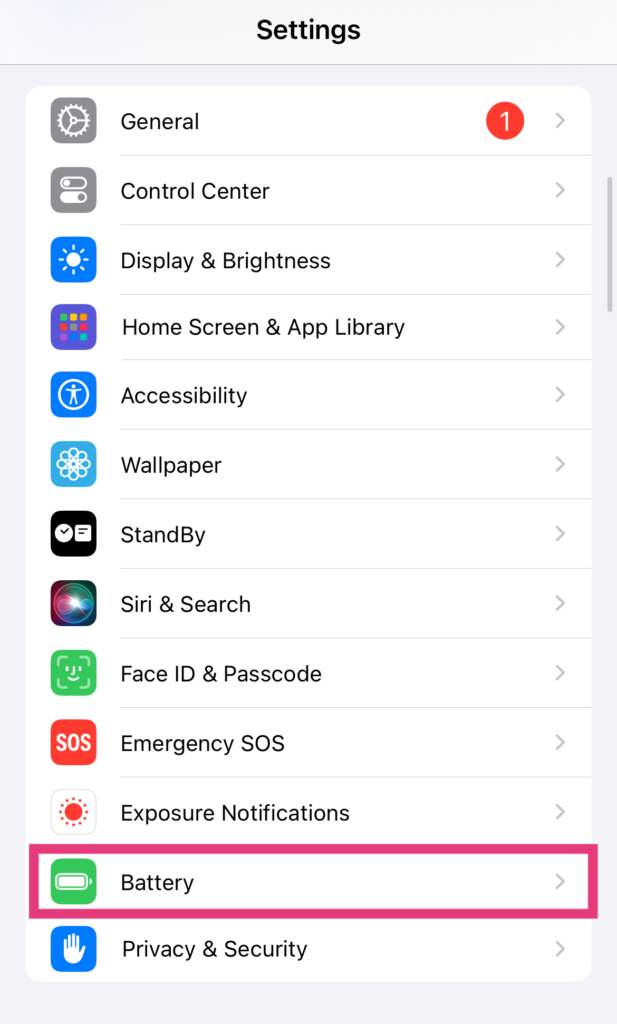
- Switch on the toggle labeled Low Power Mode.
- Open the Camera app and take your photo as usual, then upload it to Instagram.
2. Change the “Key Photo” on a Live Photo
If you shoot with Live Photos on, your iPhone captures a short burst of frames and picks one as the “key photo” — usually the one that gets the heaviest processing. Swapping the key photo to a different frame from the same burst often sidesteps that processing entirely, and you still get a photo you were happy with a split-second before or after the original shot.
- Open the Live Photo in your Photos app and swipe up (or tap Edit) to see the filmstrip of frames.
- Drag the slider under the photo to a different frame in the burst.
- Tap Make Key Photo on the frame you prefer.
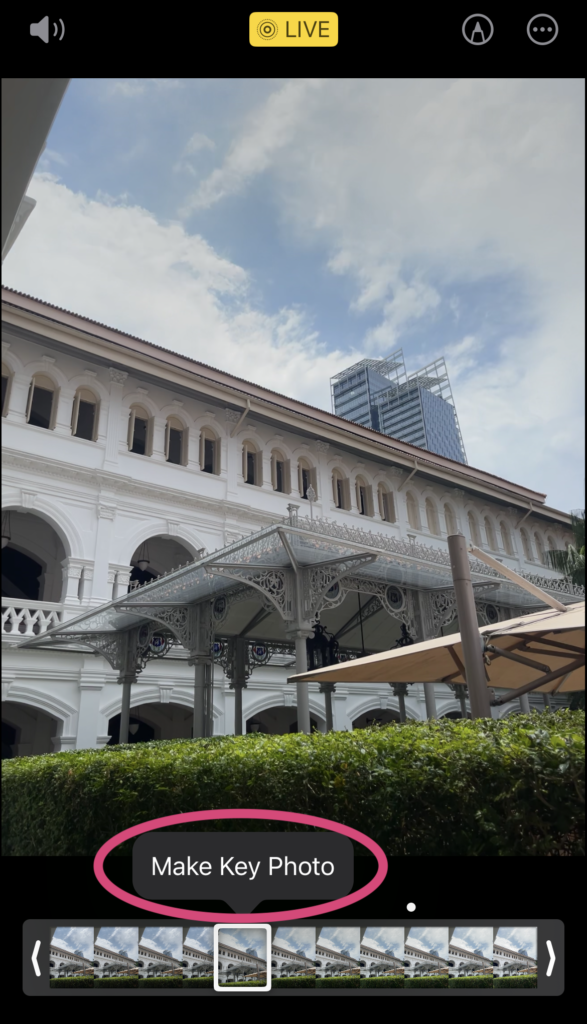
- Tap Done to save the change, then upload that photo to Instagram as usual.
3. Edit the Photo in a Third-Party App First
The most reliable option: open the photo in an editing app like Lightroom, VSCO, or Snapseed, adjust saturation, brightness, and contrast to taste, and export it back to your camera roll as a new file. Upload that exported version to Instagram — since it’s now a standard processed image rather than a fresh camera capture, it uploads as-is.

Note: this fixes brightness and color, not compression. If your uploads are coming out blurry or blocky rather than over-processed, that’s a separate issue — see why your Instagram Stories might look blurry for that fix.
Grow the Right Way Once Your Feed Looks Right
Getting your photos to look the way you intended is step one of building a feed people actually want to follow. Once your aesthetic is dialed in, the next question is usually who’s actually seeing it and whether your account is growing in a healthy direction.
That’s the problem Hexrate is built around. It’s an end-to-end Instagram marketing platform, not a single trick: Pulse turns your account data into a daily action plan — what to post, what to answer, what changed; Discover is a creator directory with real profile audits (follower quality, suggested rate, profile health); Campaigns tracks hashtag and mention campaigns with a UGC vault and reach/CPM/CPE reporting; and Reports & Media Kit builds white-label reports plus a public media kit at your own @username.
Frequently Asked Questions
How do I stop Instagram from changing my photo quality?
Shoot with Low Power Mode on, change the key photo if it’s a Live Photo, or edit the image in a third-party app like Lightroom or VSCO before uploading. All three work by changing what iOS does to the photo before it reaches Instagram, since Instagram itself doesn’t have an editable “enhance” setting to turn off.
Why do my Reels look overly bright on Instagram?
This is usually HDR video playback, not the same issue as photo auto-enhance. Instagram displays HDR video at higher brightness and contrast to preserve detail, but on some screens that can look blown-out rather than crisp. You can turn this display behavior off in your settings (see below).
How do I turn off HDR playback on Instagram?
Instagram has a dedicated setting for this — it only changes how HDR content displays to you, not how your own uploads are processed:
1. Tap the menu icon on your profile and open Settings and activity (labeled Settings and privacy in some app versions).
2. Scroll to “Your app and media” and tap Media Quality.
3. Turn on the toggle for Disable display of HDR media.
Smart marketers run Instagram with Hexrate!
See what it can do for you.
Pulse, Discover, Campaigns, and Reports & Media Kit: one platform for your whole Instagram workflow. No follower-count promises, just real data.
Get started
A practical system for coordinating multiple creators in one Instagram campaign without losing track of deliverables, deadlines, or spend.

What to put in an Instagram influencer campaign brief, plus a free copy paste template brands can use for their next collaboration.

Fake and bot followers now account for more than half of reported fraud cases, and 2026's industry data shows why brands can no longer treat…
What brands check on a creator's profile before ever sending a pitch, and how to pass that check before you reach out.

A clear breakdown of what separates a paid partnership from an organic mention on Instagram, and why the difference matters for brands vetting creators.
 English
  Español
  Deutsch
  Română
  Français
  Italiano
  Polski
  Português
  Українська
  Русский
  Lietuviškai
  Türkçe